Tuesday, December 06, 2016

Using Helm to install Traefik as an Ingress Controller in Kubernetes

That was a mouthful of a title...Hope this post lives up to it :)

First of all, just a bit of theory. If you want to expose your application running on Kubernetes to the outside world, you have several choices.

One choice you have is to expose the pods running your application via a Service of type NodePort or LoadBalancer. If you run your service as a NodePort, Kubernetes will allocate a random high port on every node in the cluster, and it will proxy traffic to that port to your service. Services of type LoadBalancer are only supported if you run your Kubernetes cluster using certain specific cloud providers such as AWS and GCE. In this case, the cloud provider will create a specific load balancer resource, for example an Elastic Load Balancer in AWS, which will then forward traffic to the pods comprising your service. Either way, the load balancing you get by exposing a service is fairly crude, at the TCP layer and using a round-robin algorithm.

A better choice for exposing your Kubernetes application is to use Ingress resources together with Ingress Controllers. An ingress resource is a fancy name for a set of layer 7 load balancing rules, as you might be familiar with if you use HAProxy or Pound as a software load balancer. An Ingress Controller is a piece of software that actually implements those rules by watching the Kubernetes API for requests to Ingress resources. Here is a fragment from the Ingress Controller documentation on GitHub:

What is an Ingress Controller?

An Ingress Controller is a daemon, deployed as a Kubernetes Pod, that watches the ApiServer's /ingresses endpoint for updates to the Ingress resource. Its job is to satisfy requests for ingress.
Writing an Ingress Controller

Writing an Ingress controller is simple. By way of example, the nginx controller does the following:
  • Poll until apiserver reports a new Ingress
  • Write the nginx config file based on a go text/template
  • Reload nginx
As I mentioned in a previous post, I warmly recommend watching a KubeCon presentation from Gerred Dillon on "Kubernetes Ingress: Your Router, Your Rules" if you want to further delve into the advantages of using Ingress Controllers as opposed to plain Services.
While nginx is the only software currently included in the Kubernetes source code as an Ingress Controller, I wanted to experiment with a full-fledged HTTP reverse proxy such as Traefik. I should add from the beginning that only nginx offers the TLS feature of Ingress resources. Traefik can terminate SSL of course, and I'll show how you can do that, but it is outside of the Ingress resource spec.

I've also been looking at Helm, the Kubernetes package manager, and I noticed that Traefik is one of the 'stable' packages (or Charts as they are called) currently offered by Helm, so I went the Helm route in order to install Traefik. In the following instructions I will assume that you are already running a Kubernetes cluster in AWS and that your local kubectl environment is configured to talk to that cluster.

Install Helm

This is pretty easy. Follow the instructions on GitHub to download or install a binary for your OS.

Initialize Helm

Run helm init in order to install the server component of Helm, called tiller, which will be run as a Kubernetes Deployment in the kube-system namespace of your cluster.

Get the Traefik Helm chart from GitHub

I git cloned the entire kubernetes/charts repo, then copied the traefik directory locally under my own source code repo which contains the rest of the yaml files for my Kubernetes resource manifests.

# git clone https://github.com/kubernetes/charts.git helmcharts
# cp -r helmcharts/stable/traefik traefik-helm-chart

It is instructive to look at the contents of a Helm chart. The main advantage of a chart in my view is the bundling together of all the Kubernetes resources necessary to run a specific set of services. The other advantage is that you can use Go-style templates for the resource manifests, and the variables in those template files can be passed to helm via a values.yaml file or via the command line.

For more details on Helm charts and templates, I recommend this linux.com article.

Create an Ingress resource for your application service

I copied the dashboard-ingress.yaml template file from the Traefik chart and customized it so as to refer to my application's web service, which is running in a Kubernetes namespace called tenant1.

# cd traefik-helm-chart/templates
# cp dashboard-ingress.yaml web-ingress.yaml
# cat web-ingress.yaml
{{- if .Values.tenant1.enabled }}
apiVersion: extensions/v1beta1
kind: Ingress
metadata:
 namespace: {{ .Values.tenant1.namespace }}
 name: {{ template "fullname" . }}-web-ingress
 labels:
   app: {{ template "fullname" . }}
   chart: "{{ .Chart.Name }}-{{ .Chart.Version }}"
   release: "{{ .Release.Name }}"
   heritage: "{{ .Release.Service }}"
spec:
 rules:
 - host: {{ .Values.tenant1.domain }}
   http:
     paths:
     - path: /
       backend:
         serviceName: {{ .Values.tenant1.serviceName }}
         servicePort: {{ .Values.tenant1.servicePort }}
{{- end }}

The variables referenced in the template above are defined in the values.yaml file in the Helm chart. I started with the variables in the values.yaml file that came with the Traefik chart and added my own customizations:

# vi traefik-helm-chart/values.yaml
ssl:
 enabled: true
acme:
 enabled: true
 email: admin@mydomain.com
 staging: false
 # Save ACME certs to a persistent volume. WARNING: If you do not do this, you will re-request
 # certs every time a pod (re-)starts and you WILL be rate limited!
 persistence:
   enabled: true
   storageClass: kubernetes.io/aws-ebs
   accessMode: ReadWriteOnce
   size: 1Gi
dashboard:
 enabled: true
 domain: tenant1-lb.dev.mydomain.com
gzip:
 enabled: false
tenant1:
 enabled: true
 namespace: tenant1
 domain: tenant1.dev.mydomain.com
 serviceName: web
 servicePort: http

Note that I added a section called tenant1, where I defined the variables referenced in the web-ingress.yaml template above. I also enabled the ssl and acme sections, so that Traefik can automatically install SSL certificates from Let's Encrypt via the ACME protocol.

Install your customized Helm chart for Traefik

With these modifications done, I ran 'helm install' to actually deploy the various Kubernetes resources included in the Traefik chart. 

I specified the directory containing my Traefik chart files (traefik-helm-chart) as the last argument passed to helm install:

# helm install --name tenant1-lb --namespace tenant1 traefik-helm-chart/
NAME: tenant1-lb
LAST DEPLOYED: Tue Nov 29 09:51:12 2016
NAMESPACE: tenant1
STATUS: DEPLOYED

RESOURCES:
==> extensions/Ingress
NAME                                  HOSTS                    ADDRESS   PORTS     AGE
tenant1-lb-traefik-web-ingress   tenant1.dev.mydomain.com             80        1s
tenant1-lb-traefik-dashboard   tenant1-lb.dev.mydomain.com             80        0s

==> v1/PersistentVolumeClaim
NAME                    STATUS    VOLUME    CAPACITY   ACCESSMODES   AGE
tenant1-lb-traefik-acme   Pending                                      0s

==> v1/Secret
NAME                            TYPE      DATA      AGE
tenant1-lb-traefik-default-cert   Opaque    2         1s

==> v1/ConfigMap
NAME               DATA      AGE
tenant1-lb-traefik   1         1s

==> v1/Service
NAME                         CLUSTER-IP   EXTERNAL-IP   PORT(S)   AGE
tenant1-lb-traefik-dashboard   10.3.0.15    <none>        80/TCP    1s
tenant1-lb-traefik   10.3.0.215   <pending>   80/TCP,443/TCP   1s

==> extensions/Deployment
NAME               DESIRED   CURRENT   UP-TO-DATE   AVAILABLE   AGE
tenant1-lb-traefik   1         1         1            0           1s


NOTES:
1. Get Traefik's load balancer IP/hostname:

    NOTE: It may take a few minutes for this to become available.

    You can watch the status by running:

        $ kubectl get svc tenant1-lb-traefik --namespace tenant1 -w

    Once 'EXTERNAL-IP' is no longer '<pending>':

        $ kubectl describe svc tenant1-lb-traefik --namespace tenant1 | grep Ingress | awk '{print $3}'

2. Configure DNS records corresponding to Kubernetes ingress resources to point to the load balancer IP/hostname found in step 1

At this point you should see two Ingress resources, one for the Traefik dashboard and on for the custom web ingress resource:

# kubectl --namespace tenant1 get ingress
NAME                           HOSTS                       ADDRESS   PORTS     AGE
tenant1-lb-traefik-dashboard   tenant1-lb.dev.mydomain.com           80        50s
tenant1-lb-traefik-web-ingress tenant1.dev.mydomain.com            80        51s

As per the Helm notes above (shown as part of the output of helm install), run this command to figure out the CNAME of the AWS ELB created by Kubernetes during the creation of the tenant1-lb-traefik service of type LoadBalancer:

# kubectl describe svc tenant1-lb-traefik --namespace tenant1 | grep Ingress | awk '{print $3}'
a5be275d8b65c11e685a402e9ec69178-91587212.us-west-2.elb.amazonaws.com

Create tenant1.dev.mydomain.com and tenant1-lb.dev.mydomain.com as DNS CNAME records pointing to a5be275d8b65c11e685a402e9ec69178-91587212.us-west-2.elb.amazonaws.com.

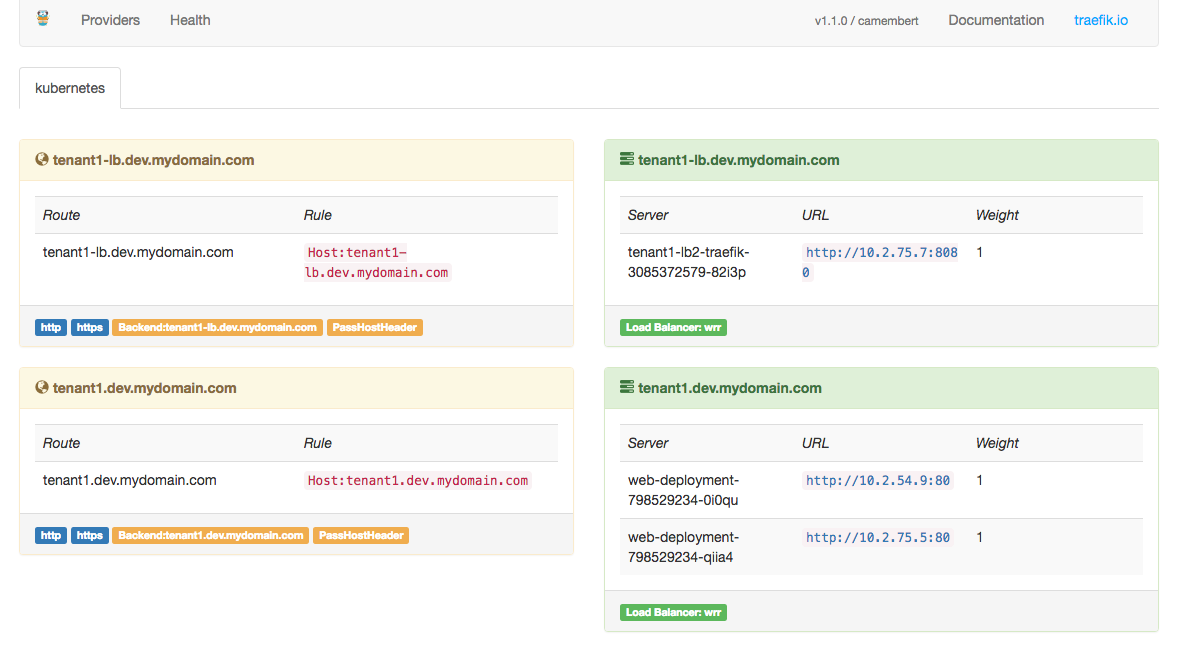
Now, if you hit http://tenant1-lb.dev.mydomain.com you should see the Traefik dashboard showing the frontends on the left and the backends on the right:

Screen Shot 2016-11-29 at 10.54.07 AM.png
If you hit http://tenant1.dev.mydomain.com you should see your web service in action.

You can also inspect the logs of the tenant1-lb-traefik pod to see what's going on under the covers when Traefik is launched and to verify that the Let's Encrypt SSL certificates were properly downloaded via ACME:

# kubectl --namespace tenant1 logs tenant1-lb-traefik-3710322105-o2887
time="2016-11-29T00:03:51Z" level=info msg="Traefik version v1.1.0 built on 2016-11-18_09:20:46AM"
time="2016-11-29T00:03:51Z" level=info msg="Using TOML configuration file /config/traefik.toml"
time="2016-11-29T00:03:51Z" level=info msg="Preparing server http &{Network: Address::80 TLS:<nil> Redirect:<nil> Auth:<nil> Compress:false}"
time="2016-11-29T00:03:51Z" level=info msg="Preparing server https &{Network: Address::443 TLS:0xc4201b1800 Redirect:<nil> Auth:<nil> Compress:false}"
time="2016-11-29T00:03:51Z" level=info msg="Starting server on :80"
time="2016-11-29T00:03:58Z" level=info msg="Loading ACME Account..."
time="2016-11-29T00:03:59Z" level=info msg="Loaded ACME config from store /acme/acme.json"
time="2016-11-29T00:04:01Z" level=info msg="Starting provider *main.WebProvider {\"Address\":\":8080\",\"CertFile\":\"\",\"KeyFile\":\"\",\"ReadOnly\":false,\"Auth\":null}"
time="2016-11-29T00:04:01Z" level=info msg="Starting provider *provider.Kubernetes {\"Watch\":true,\"Filename\":\"\",\"Constraints\":[],\"Endpoint\":\"\",\"DisablePassHostHeaders\":false,\"Namespaces\":null,\"LabelSelector\":\"\"}"
time="2016-11-29T00:04:01Z" level=info msg="Retrieving ACME certificates..."
time="2016-11-29T00:04:01Z" level=info msg="Retrieved ACME certificates"
time="2016-11-29T00:04:01Z" level=info msg="Starting server on :443"
time="2016-11-29T00:04:01Z" level=info msg="Server configuration reloaded on :80"
time="2016-11-29T00:04:01Z" level=info msg="Server configuration reloaded on :443"

To get an even better warm and fuzzy feeling about the SSL certificates installed via ACME, you can run this command against the live endpoint tenant1.dev.mydomain.com:

# echo | openssl s_client -showcerts -servername tenant1.dev.mydomain.com -connect tenant1.dev.mydomain.com:443 2>/dev/null
CONNECTED(00000003)
---
Certificate chain
0 s:/CN=tenant1.dev.mydomain.com
  i:/C=US/O=Let's Encrypt/CN=Let's Encrypt Authority X3
-----BEGIN CERTIFICATE-----
MIIGEDCCBPigAwIBAgISAwNwBNVU7ZHlRtPxBBOPPVXkMA0GCSqGSIb3DQEBCwUA
-----END CERTIFICATE-----
1 s:/C=US/O=Let's Encrypt/CN=Let's Encrypt Authority X3
  i:/O=Digital Signature Trust Co./CN=DST Root CA X3
-----BEGIN CERTIFICATE-----
uM2VcGfl96S8TihRzZvoroed6ti6WqEBmtzw3Wodatg+VyOeph4EYpr/1wXKtx8/
KOqkqm57TH2H3eDJAkSnh6/DNFu0Qg==
-----END CERTIFICATE-----
---
Server certificate
subject=/CN=tenant1.dev.mydomain.com
issuer=/C=US/O=Let's Encrypt/CN=Let's Encrypt Authority X3
---
No client certificate CA names sent
---
SSL handshake has read 3009 bytes and written 713 bytes
---
New, TLSv1/SSLv3, Cipher is AES128-SHA
Server public key is 4096 bit
Secure Renegotiation IS supported
Compression: NONE
Expansion: NONE
SSL-Session:
   Protocol  : TLSv1
   Cipher    : AES128-SHA
   Start Time: 1480456552
   Timeout   : 300 (sec)
   Verify return code: 0 (ok)
etc.

Other helm commands

You can list the Helm releases that are currently running (a Helm release is a particular versioned instance of a Helm chart) with helm list:

# helm list
NAME        REVISION UPDATED                  STATUS   CHART
tenant1-lb    1        Tue Nov 29 10:13:47 2016 DEPLOYED traefik-1.1.0-a


If you change any files or values in a Helm chart, you can apply the changes by means of the 'helm upgrade' command:

# helm upgrade tenant1-lb traefik-helm-chart

You can see the status of a release with helm status:

# helm status tenant1-lb
LAST DEPLOYED: Tue Nov 29 10:13:47 2016
NAMESPACE: tenant1
STATUS: DEPLOYED

RESOURCES:
==> v1/Service
NAME               CLUSTER-IP   EXTERNAL-IP        PORT(S)          AGE
tenant1-lb-traefik   10.3.0.76    a92601b47b65f...   80/TCP,443/TCP   35m
tenant1-lb-traefik-dashboard   10.3.0.36   <none>    80/TCP    35m

==> extensions/Deployment
NAME               DESIRED   CURRENT   UP-TO-DATE   AVAILABLE   AGE
tenant1-lb-traefik   1         1         1            1           35m

==> extensions/Ingress
NAME                                  HOSTS                    ADDRESS   PORTS     AGE
tenant1-lb-traefik-web-ingress   tenant1.dev.mydomain.com             80        35m
tenant1-lb-traefik-dashboard   tenant1-lb.dev.mydomain.com             80        35m

==> v1/PersistentVolumeClaim
NAME                    STATUS    VOLUME                                     CAPACITY   ACCESSMODES   AGE
tenant1-lb-traefik-acme   Bound     pvc-927df794-b65f-11e6-85a4-02e9ec69178b   1Gi        RWO           35m

==> v1/Secret
NAME                            TYPE      DATA      AGE
tenant1-lb-traefik-default-cert   Opaque    2         35m

==> v1/ConfigMap
NAME               DATA      AGE
tenant1-lb-traefik   1         35m


Tuesday, November 29, 2016

Kubernetes resource graphing with Heapster, InfluxDB and Grafana

I know that the Cloud Native Computing Foundation chose Prometheus as the monitoring platform of choice for Kubernetes, but in this post I'll show you how to quickly get started with graphing CPU, memory, disk and network in a Kubernetes cluster using Heapster, InfluxDB and Grafana.

The documentation in the kubernetes/heapster GitHub repo is actually pretty good. Here's what I did:

$ git clone https://github.com/kubernetes/heapster.git
$ cd heapster/deploy/kube-config/influxdb

Look at the yaml manifests to see if you need to customize anything. I left everything 'as is' and ran:

$ kubectl create -f .
deployment "monitoring-grafana" created
service "monitoring-grafana" created
deployment "heapster" created
service "heapster" created
deployment "monitoring-influxdb" created
service "monitoring-influxdb" created

Then you can run 'kubectl cluster-info' and look for the monitoring-grafana endpoint. Since the monitoring-grafana service is of type LoadBalancer, if you run your Kubernetes cluster in AWS, the service creation will also involve the creation of an ELB. By default the ELB security group allows 80 from all, so I edited that to restrict it to some known IPs.

After a few minutes, you should see CPU and memory graphs shown in the Kubernetes dashboard. Here is an example showing pods running in the kube-system namespace:


You can also hit the Grafana endpoint and choose the Cluster or Pods dashboards. Note that if you have a namespace different from default and kube-system, you have to enter its name manually in the namespace field of the Grafana Pods dashboard. Only then you'll be able to see data corresponding to pods running in that namespace (or at least I had to jump through that hoop.)

Here is an example of graphs for the kubernetes-dashboard pod running in the kube-system namespace:


For info on how to customize the Grafana graphs, here's a good post from Deis.

Tuesday, November 22, 2016

Running an application using Kubernetes on AWS

I've been knee-deep in Kubernetes for the past few weeks and to say that I like it is an understatement. It's exhilarating to have at your fingertips a distributed platfom created by Google's massive brain power.

I'll jump right in and talk about how I installed Kubernetes in AWS and how I created various resources in Kubernetes in order to run a database-backed PHP-based web application.

Installing Kubernetes

I used the tack tool from my laptop running OSX to spin up a Kubernetes cluster in AWS. Tack uses terraform under the hood, which I liked a lot because it makes it very easy to delete all AWS resources and start from scratch while you are experimenting with it. I went with the tack defaults and spun up 3 m3.medium EC2 instances for running etcd and the Kubernetes API, the scheduler and the controller manager in an HA configuration. Tack also provisioned 3 m3.medium EC2 instances as Kubernetes workers/minions, in an EC2 auto-scaling group. Finally, tack spun up a t2.nano EC2 instance to server as a bastion host for getting access into the Kubernetes cluster. All 7 EC2 instances launched by tack run CoreOS.

Using kubectl

Tack also installs kubectl, which is the Kubernetes command-line management tool. I used kubectl to create the various Kubernetes resources needed to run my application: deployments, services, secrets, config maps, persistent volumes etc. It pays to become familiar with the syntax and arguments of kubectl.

Creating namespaces

One thing I needed to do right off the bat was to think about ways to achieve multi-tenancy in my Kubernetes cluster. This is done with namespaces. Here's my namespace.yaml file:

$ cat namespace.yaml
apiVersion: v1
kind: Namespace
metadata:
  name: tenant1

To create the namespace tenant1, I used kubectl create:

$ kubectl create -f namespace.yaml

To list all namespaces:

$ kubectl get namespaces
NAME          STATUS    AGE
default       Active    12d
kube-system   Active    12d
tenant1       Active    11d 

If you don't need a dedicated namespace per tenant, you can just run kubectl commands in the 'default' namespace.

Creating persistent volumes, storage classes and persistent volume claims

I'll show how you can create two types of Kubernetes persistent volumes in AWS: one based on EFS, and one based on EBS. I chose the EFS one for my web application layer, for things such as shared configuration and media files. I chose the EBS one for my database layer, to be mounted as the data volume.

First, I created an EFS share using the AWS console (although I recommend using terraform to do it automatically, but I am not there yet). I allowed the Kubernetes worker security group to access this share. I noted one of the DNS names available for it, e.g. us-west-2a.fs-c830ab1c.efs.us-west-2.amazonaws.com. I used this Kubernetes manifest to define a persistent volume (PV) based on this EFS share:

$ cat web-pv-efs.yaml
apiVersion: v1
kind: PersistentVolume
metadata:
  name: pv-efs-web
spec:
  capacity:
    storage: 50Gi
  accessModes:
    - ReadWriteMany
  nfs:
    server: s-west-2a.fs-c830ab1c.efs.us-west-2.amazonaws.com
    path: "/"

To create the PV, I used kubectl create, and I also specified the namespace tenant1:

$ kubectl create -f web-pv-efs.yaml --namespace tenant1

However, creating a PV is not sufficient. Pods use persistent volume claims (PVC) to refer to persistent volumes in their manifests. So I had to create a PVC:

$ cat web-pvc.yaml
apiVersion: v1
kind: PersistentVolumeClaim
metadata:
  name: web-pvc
spec:
  accessModes:
    - ReadWriteMany
  resources:
    requests:
      storage: 50Gi 

$ kubectl create -f web-pvc.yaml --namespace tenant1

Note that a PVC does not refer directly to a PV. The storage specified in the PVC is provisioned from available persistent volumes.

Instead of defining a persistent volume for the EBS volume I wanted to use for the database, I created a storage class:

$ cat db-storageclass-ebs.yaml
kind: StorageClass
apiVersion: storage.k8s.io/v1beta1
metadata:
  name: db-ebs
provisioner: kubernetes.io/aws-ebs
parameters:
  type: gp2

$ kubectl create -f db-storageclass-ebs.yaml --namespace tenant1

I also created a PVC which does refer directly to the storage class name db-ebs. When the PVC is used in a pod, the underlying resource (i.e. the EBS volume in this case) will be automatically provisioned by Kubernetes.

$ cat db-pvc-ebs.yaml
apiVersion: v1
kind: PersistentVolumeClaim
metadata:
  name: db-pvc-ebs
  annotations:
     volume.beta.kubernetes.io/storage-class: 'db-ebs'
spec:
  accessModes:
    - ReadWriteMany
  resources:
    requests:
      storage: 50Gi

$ kubectl create -f db-pvc-ebs.yaml --namespace tenant1

To list the newly created resource, you can use:

$ kubectl get pv,pvc,storageclass --namespace tenant1

Creating secrets and ConfigMaps

I followed the "Persistent Installation of MySQL and Wordpress on Kubernetes" guide to figure out how to create and use Kubernetes secrets. Here is how to create a secret for the MySQL root password, necessary when you spin up a pod based on a Percona or plain MySQL image:

$ echo -n $MYSQL_ROOT_PASSWORD > mysql-root-pass.secret
$ kubectl create secret generic mysql-root-pass --from-file=mysql-root-pass.secret --namespace tenant1 


Kubernetes also has the handy notion of ConfigMap, a resource where you can store either entire configuration files, or key/value properties that you can then use in other Kubernetes resource definitions. For example, I save the GitHub branch and commit environment variables for the code I deploy in a ConfigMap:

$ kubectl create configmap git-config --namespace tenant1 \
                 --from-literal=GIT_BRANCH=$GIT_BRANCH \
                 --from-literal=GIT_COMMIT=$GIT_COMMIT

I'll show how to use secrets and ConfigMaps in pod definitions a bit later on.

Creating an ECR image pull secret and a service account

We use AWS ECR to store our Docker images. Kubernetes can access images stored in ECR, but you need to jump through a couple of hoops to make that happen. First, you need to create a Kubernetes secret of type dockerconfigjson which encapsulates the ECR credentials in base64 format. Here's a shell script that generates a file called ecr-pull-secret.yaml:

#!/bin/bash

TMP_JSON_CONFIG=/tmp/ecr_config.json

PASSWORD=$(aws --profile default --region us-west-2 ecr get-login | cut -d ' ' -f 6)

cat > $TMP_JSON_CONFIG << EOF
{"https://YOUR_AWS_ECR_ID.dkr.ecr.us-west-2.amazonaws.com":{"username":"AWS","email":"none","password":"$PASSWORD"}}
EOF


BASE64CONFIG=$(cat $TMP_JSON_CONFIG | base64)
cat > ecr-pull-secret.yaml << EOF
apiVersion: v1
kind: Secret
metadata:
  name: ecr-key
  namespace: tenant1
data:
  .dockerconfigjson: $BASE64CONFIG
type: kubernetes.io/dockerconfigjson
EOF

rm -rf $TMP_JSON_CONFIG

Once you run the script and generate the file, you can then define a Kubernetes service account that will use this secret:

$ cat service-account.yaml
apiVersion: v1
kind: ServiceAccount
metadata:
  namespace: tenant1
  name: tenant1-dev
imagePullSecrets:
 - name: ecr-key

Note that the service account refers to the ecr-key secret in the imagePullSecrets property.

As usual, kubectl create will create these resources based on their manifests:

$ kubectl create -f ecr-pull-secret.yaml
$ kubectl create -f service-account.yaml


Creating deployments

The atomic unit of scheduling in Kubernetes is a pod. You don't usually create a pod directly (though you can, and I'll show you a case where it makes sense.) Instead, you create a deployment, which keeps track of how many pod replicas you need, and spins up the exact number of pods to fulfill your requirement. A deployment actually creates a replica set under the covers, but in general you don't deal with replica sets directly. Note that deployments are the new recommended way to create multiple pods. The old way, which is still predominant in the documentation, was to use replication controllers.

Here's my deployment manifest for a pod running a database image:

$ cat db-deployment.yaml
apiVersion: extensions/v1beta1
kind: Deployment
metadata:
  name: db-deployment
  labels:
    app: myapp
spec:
  strategy:
    type: Recreate
  template:
    metadata:
      labels:
        app: myapp
        tier: db
    spec:
      containers:
      - name: db
        image: MY_ECR_ID.dkr.ecr.us-west-2.amazonaws.com/myapp-db:tenant1
        imagePullPolicy: Always
        env:
        - name: MYSQL_ROOT_PASSWORD
          valueFrom:
            secretKeyRef:
              name: mysql-root-pass
              key: mysql-root-pass.secret
        - name: MYSQL_DATABASE
          valueFrom:
            configMapKeyRef:
              name: tenant1-config
              key: MYSQL_DATABASE
        - name: MYSQL_USER
          valueFrom:
            configMapKeyRef:
              name: tenant1-config
              key: MYSQL_USER
        - name: MYSQL_DUMP_FILE
          valueFrom:
            configMapKeyRef:
              name: tenant1-config
              key: MYSQL_DUMP_FILE
        - name: S3_BUCKET
          valueFrom:
            configMapKeyRef:
              name: tenant1-config
              key: S3_BUCKET
        ports:
        - containerPort: 3306
          name: mysql
        volumeMounts:
        - name: ebs
          mountPath: /var/lib/mysql
      volumes:
      - name: ebs
        persistentVolumeClaim:
          claimName:  db-pvc-ebs
      serviceAccount: tenant1-dev

The template section specifies the elements necessary for spinning up new pods. Of particular importance are the labels, which, as we will see, are used by services to select pods that are included in a given service.  The image property specifies the ECR Docker image used to spin up new containers. In my case, the image is called myapp-db and it is tagged with the tenant name tenant1. Here is the Dockerfile from which this image was generated:

$ cat Dockerfile
FROM mysql:5.6

# disable interactive functions
ARG DEBIAN_FRONTEND=noninteractive

RUN apt-get update && \
    apt-get install -y python-pip
RUN pip install awscli

VOLUME /var/lib/mysql

COPY etc/mysql/my.cnf /etc/mysql/my.cnf
COPY scripts/db_setup.sh /usr/local/bin/db_setup.sh

Nothing out of the ordinary here. The image is based on the mysql DockerHub image, specifically version 5.6. The my.cnf is getting added in as a customization, and a db_setup.sh script is copied over so it can be run at a later time.

Some other things to note about the deployment manifest:

  • I made pretty heavy use of secrets and ConfigMap key/values
  • I also used the db-pvc-ebs Persistent Volume Claim and mounted the underlying physical resource (an EBS volume in this case) as /var/lib/mysql
  • I used the tenant1-dev service account, which allows the deployment to pull down the container image from ECR
  • I didn't specify the number of replicas I wanted, which means that 1 pod will be created (the default)

To create the deployment, I ran kubectl:

$ kubectl create -f db-deployment.yaml --record --namespace tenant1

Note that I used the --record flag, which tells Kubernetes to keep a history of the commands used to create or update that deployment. You can show this history with the kubectl rollout history command:

$ kubectl --namespace tenant1 rollout history deployment db-deployment 

To list the running deployments, replica sets and pods, you can use:

$ kubectl get get deployments,rs,pods --namespace tenant1 --show-all

Here is another example of a deployment manifest, this time for redis:

$ cat redis-deployment.yaml
apiVersion: extensions/v1beta1
kind: Deployment
metadata:
  name: redis-deployment
spec:
  replicas: 1
  minReadySeconds: 10
  template:
    metadata:
      labels:
        app: myapp
        tier: redis
    spec:
      containers:
        - name: redis
          command: ["redis-server", "/etc/redis/redis.conf", "--requirepass", "$(REDIS_PASSWORD)"]
          image: MY_ECR_ID.dkr.ecr.us-west-2.amazonaws.com/myapp-redis:tenant1
          imagePullPolicy: Always
          env:
          - name: REDIS_PASSWORD
            valueFrom:
              secretKeyRef:
                name: redis-pass
                key: redis-pass.secret
          ports:
          - containerPort: 6379
            protocol: TCP
      serviceAccount: tenant1-dev

One thing that is different from the db deployment is the way a secret (REDIS_PASSWORD) is used as a command-line parameter for the container command. Make sure you use in this case the syntax $(VARIABLE_NAME) because that's what Kubernetes expects.

Also note the labels, which have app: myapp in common with the db deployment, but a different value for tier, redis instead of db.

My last deployment example for now is the one for the web application pods:

$ cat web-deployment.yaml
apiVersion: extensions/v1beta1
kind: Deployment
metadata:
  name: web-deployment
spec:
  replicas: 2
  strategy:
    type: Recreate
  template:
    metadata:
      labels:
        app: myapp
        tier: frontend
    spec:
      containers:
      - name: web
        image: MY_ECR_ID.dkr.ecr.us-west-2.amazonaws.com/myapp-web:tenant1
        imagePullPolicy: Always
        ports:
        - containerPort: 80
          name: web
        volumeMounts:
        - name: web-persistent-storage
          mountPath: /var/www/html/shared
      volumes:
      - name: web-persistent-storage
        persistentVolumeClaim:
          claimName: web-pvc
      serviceAccount: tenant1-dev

Note that replicas is set to 2, so that 2 pods will be launched and kept running at all times. The labels have the same common part app: myapp, but the tier is different, set to frontend.  The persistent volume claim web-pvc for the underlying physical EFS volume is used to mount /var/www/html/shared over EFS.

The image used for the container is derived from a stock ubuntu:14.04 DockerHub image, with apache and php 5.6 installed on top. Something along these lines:

FROM ubuntu:14.04

RUN apt-get update && \
    apt-get install -y ntp build-essential binutils zlib1g-dev telnet git acl lzop unzip mcrypt expat xsltproc python-pip curl language-pack-en-base && \
    pip install awscli

RUN export LC_ALL=en_US.UTF-8 && export LC_ALL=en_US.UTF-8 && export LANG=en_US.UTF-8 && \
        apt-get install -y mysql-client-5.6 software-properties-common && add-apt-repository ppa:ondrej/php

RUN apt-get update && \
    apt-get install -y --allow-unauthenticated apache2 apache2-utils libapache2-mod-php5.6 php5.6 php5.6-mcrypt php5.6-curl php-pear php5.6-common php5.6-gd php5.6-dev php5.6-opcache php5.6-json php5.6-mysql

RUN apt-get remove -y libapache2-mod-php5 php7.0-cli php7.0-common php7.0-json php7.0-opcache php7.0-readline php7.0-xml

RUN curl -sSL https://getcomposer.org/composer.phar -o /usr/bin/composer \
    && chmod +x /usr/bin/composer \
    && composer selfupdate

COPY files/apache2-foreground /usr/local/bin/
RUN chmod +x /usr/local/bin/apache2-foreground
EXPOSE 80
CMD bash /usr/local/bin/apache2-foreground

Creating services

In Kubernetes, you are not supposed to refer to individual pods when you want to target the containers running inside them. Instead, you need to use services, which provide endpoints for accessing a set of pods based on a set of labels.

Here is an example of a service for the db-deployment I created above:

$ cat db-service.yaml

apiVersion: v1
kind: Service
metadata:
  name: db
  labels:
    app: myapp
spec:
  ports:
    - port: 3306
  selector:
    app: myapp
    tier: db
  clusterIP: None

Note the selector property, which is set to app: myapp and tier: db. By specifying these labels, we make sure that only the deployments tagged with those labels will be included in this service. There is only one deployment with those 2 labels, and that is db-deployment.

Here are similar service manifests for the redis and web deployments:

$ cat redis-service.yaml
apiVersion: v1
kind: Service
metadata:
  name: redis
  labels:
    app: myapp
spec:
  ports:
    - port: 6379
  selector:
    app: myapp
    tier: redis
  clusterIP: None

$ cat web-service.yaml
apiVersion: v1
kind: Service
metadata:
  name: web
  labels:
    app: myapp
spec:
  ports:
    - port: 80
  selector:
    app: myapp
    tier: frontend
  type: LoadBalancer

The selector properties for each service are set so that the proper deployment is included in each service.

One important thing to note in the definition of the web service: its type is set to LoadBalancer. Since Kubernetes is AWS-aware, the service creation will create an actual ELB in AWS, so that the application can be accessible from the outside world. It turns out that this is not the best way to expose applications externally, since this LoadBalancer resource operates only at the TCP layer. What we need is a proper layer 7 load balancer, and in a future post I'll show how to use a Kubernetes ingress controller in conjunction with the traefik proxy to achieve that. In the mean time, here is a KubeCon presentation from Gerred Dillon on "Kubernetes Ingress: Your Router, Your Rules".

To create the services defined above, I used kubectl:

$ kubectl create -f db-service.yaml --namespace tenant1
$ kubectl create -f redis-service.yaml --namespace tenant1
$ kubectl create -f web-service.yaml --namespace tenant1

At this point, the web application can refer to the database 'host' in its configuration files by simply using the name of the database service, which is db in our example. Similarly, the web application can refer to the redis 'host' by using the name of the redis service, which is redis. The Kubernetes magic will make sure calls to db and redis are properly routed to their end destinations, which are the actual containers running those services.

Running commands inside pods with kubectl exec

Although you are not really supposed to do this in a container world, I found it useful to run a command such as loading a database from a MySQL dump file on a newly created pod. Kubernetes makes this relatively easy via the kubectl exec functionality. Here's how I did it:

DEPLOYMENT=db-deployment
NAMESPACE=tenant1

POD=$(kubectl --namespace $NAMESPACE get pods --show-all | grep $DEPLOYMENT | awk '{print $1}')
echo Running db_setup.sh command on pod $POD
kubectl --namespace $NAMESPACE exec $POD -it /usr/local/bin/db_setup.sh

where db_setup.sh downloads a sql.tar.gz file from S3 and loads it into MySQL.

A handy troubleshooting tool is to get a shell prompt inside a pod. First you get the pod name (via kubectl get pods --show-all), then you run:

$ kubectl --namespace tenant1 exec -it $POD -- bash -il

Sharing volumes across containers

One of the patterns I found useful in docker-compose files is to mount a container volume into another container, for example to check out the source code in a container volume, then mount it as /var/www/html in another container running the web application. This pattern is not extremely well supported in Kubernetes, but you can find your way around it by using init-containers.

Here's an example of creating an individual pod for the sole purpose of running a Capistrano task against the web application source code. Simply running two regular containers inside the same pod would not achieve this goal, because the order of creation for those containers is random. What we need is to force one container to start before any regular containers by declaring it to be an 'init-container'.

$ cat capistrano-pod.yaml
apiVersion: v1
kind: Pod
metadata:
  name: capistrano
  annotations:
     pod.beta.kubernetes.io/init-containers: '[
            {
                "name": "data4capistrano",
                "image": "MY_ECR_ID.dkr.ecr.us-west-2.amazonaws.com/myapp-web:tenant1",
                "command": ["cp", "-rH", "/var/www/html/current", "/tmpfsvol/"],
                "volumeMounts": [
                    {
                        "name": "crtvol",
                        "mountPath": "/tmpfsvol"
                    }
                ]
            }
        ]'
spec:
  containers:
  - name: capistrano
    image: MY_ECR_ID.dkr.ecr.us-west-2.amazonaws.com/capistrano:tenant1
    imagePullPolicy: Always
    command: [ "cap", "$(CAP_STAGE)", "$(CAP_TASK)", "--trace" ]
    env:
    - name: CAP_STAGE
      valueFrom:
        configMapKeyRef:
          name: tenant1-cap-config
          key: CAP_STAGE
    - name: CAP_TASK
      valueFrom:
        configMapKeyRef:
          name: tenant1-cap-config
          key: CAP_TASK
    - name: DEPLOY_TO
      valueFrom:
        configMapKeyRef:
          name: tenant1-cap-config
          key: DEPLOY_TO
    volumeMounts:
    - name: crtvol
      mountPath: /var/www/html
    - name: web-persistent-storage
      mountPath: /var/www/html/shared
  volumes:
  - name: web-persistent-storage
    persistentVolumeClaim:
      claimName: web-pvc
  - name: crtvol
    emptyDir: {}
  restartPolicy: Never
  serviceAccount: tenant1-dev

The logic is here is a bit convoluted. Hopefully some readers of this post will know a better way to achieve the same thing. What I am doing here is launching a container based on the myapp-web:tenant1 Docker image, which already contains the source code checked out from GitHub. This container is declared as an init-container, so it's guaranteed to run first. What it does is it mounts a special Kubernetes volume declared at the bottom of the pod manifest as an emptyDir. This means that Kubernetes will allocate some storage on the node where this pod will run. The data4capistrano container runs a command which copies the contents of the /var/www/html/current directory from the myapp-web image into this storage space mounted as /tmpfsvol inside data4capistrano. One other thing to note is that init-containers are a beta feature currently, so their declaration needs to be embedded into an annotation.

When the regular capistrano container is created inside the pod, it also mounts the same emptyDir container (which is not empty at this point, because it was populated by the init-container), this time as /var/www/html. It also mounts the shared EFS file system as /var/www/html/shared. With these volumes in place, it has all it needs in order to run Capistrano locally via the cap command. The stage, task, and target directory for Capistrano are passed via ConfigMaps values.

One thing to note is that the RestartPolicy is set to Never for this pod, because we only want to run it once and be done with it.

To run the pod, I used kubectl again:

$ kubectl create -f capistrano-pod.yaml --namespace tenant1

Creating jobs

Kubernetes also has the concept of jobs, which differ from deployments in that they run one instance of a pod and make sure it completes. Jobs are useful for one-off tasks that you want to run, or for periodic tasks such as cron commands. Here is an example of a job manifest which runs a script that uses the twig template engine under the covers in order to generate a configuration file for the web application:

$ cat template-job.yaml
apiVersion: batch/v1
kind: Job
metadata:
  name: myapp-template
spec:
  template:
    metadata:
      name: myapp-template
    spec:
      containers:
      - name: myapp-template
        image: Y_ECR_ID.dkr.ecr.us-west-2.amazonaws.com/myapp-template:tenant1
        imagePullPolicy: Always
        command: [ "php", "/root/scripts/templatize.php"]
        env:
        - name: DBNAME
          valueFrom:
            configMapKeyRef:
              name: tenant1-config
              key: MYSQL_DATABASE
        - name: DBUSER
          valueFrom:
            configMapKeyRef:
              name: tenant1-config
              key: MYSQL_USER
        - name: DBPASSWORD
          valueFrom:
            secretKeyRef:
              name: mysql-db-pass
              key: mysql-db-pass.secret
        - name: REDIS_PASSWORD
          valueFrom:
            secretKeyRef:
              name: redis-pass
              key: redis-pass.secret
        volumeMounts:
        - name: web-persistent-storage
          mountPath: /var/www/html/shared
      volumes:
      - name: web-persistent-storage
        persistentVolumeClaim:
          claimName: web-pvc
      restartPolicy: Never
      serviceAccount: tenant1-dev

The templatize.php script substitutes DBNAME, DBUSER, DBPASSWORD and REDIS_PASSWORD with the values passed in the job manifest, obtained from either Kubernetes secrets or ConfigMaps.

To create the job, I used kubectl:

$ kubectl create -f template-job.yaml --namespace tenant1

Performing rolling updates and rollbacks for Kubernetes deployments

Once your application pods are running, you'll need to update the application to a new version. Kubernetes allows you to do a rolling update of your deployments. One advantage of using deployments as opposed to the older method of using replication controllers is that the update process for deployment happens on the Kubernetes server side, and can be paused and restarted. There are a few ways of doing a rolling update for a deployment (and a recent linux.com article has a good overview as well).

a) You can modify the deployment's yaml file and change a label such as a version or a git commit, then run kubectl apply:

$ kubectl --namespace tenant1 apply -f deployment.yaml

Note from the Kubernetes documentation on updating deployments:

a Deployment’s rollout is triggered if and only if the Deployment’s pod template (i.e. .spec.template) is changed, e.g. updating labels or container images of the template. Other updates, such as scaling the Deployment, will not trigger a rollout.

b) You can use kubectl set to specify a new image for the deployment containers. Example from the documentation:

$ kubectl set image deployment/nginx-deployment nginx=nginx:1.9.1 
deployment "nginx-deployment" image update

c) You can use kubectl patch to add a unique label to the deployment spec template on the fly. This is the method I've been using, with the label being set to a timestamp:

$ kubectl patch deployment web-deployment --namespace tenant1 -p \  "{\"spec\":{\"template\":{\"metadata\":{\"labels\":{\"date\":\"`date +'%Y%M%d%H%M%S'`\"}}}}}"

When updating a deployment, a new replica set will be created for that deployment, and the specified number of pods will be launched by that replica set, while the pods from the old replica set will be shut down. However, the old replica set itself will be preserved, allowing you to perform a rollback if needed. 

If you want to roll back to a previous version, you can use kubectl rollout history to show the revisions of your deployment updates:

$ kubectl --namespace tenant1 rollout history deployment web-deployment
deployments "web-deployment"
REVISION CHANGE-CAUSE
1 kubectl create -f web-deployment.yaml --record --namespace tenant1
2 kubectl patch deployment web-deployment --namespace tenant1 -p {"spec":{"template":{"metadata":{"labels":{"date":"1479161196"}}}}}
3 kubectl patch deployment web-deployment --namespace tenant1 -p {"spec":{"template":{"metadata":{"labels":{"date":"1479161573"}}}}}
4 kubectl patch deployment web-deployment --namespace tenant1 -p {"spec":{"template":{"metadata":{"labels":{"date":"1479243444"}}}}}

Now use kubectl rollout undo to rollback to a previous revision:

$ kubectl --namespace tenant1 rollout undo deployments web-deployment --to-revision=3
deployment "web-deployment" rolled back

I should note that all these kubectl commands can be easily executed out of Jenkins pipeline scripts or shell steps. I use a Docker image to wrap kubectl and its keys so that they I don't have to install it on the Jenkins worker nodes.

And there you have it. I hope the examples I provided will shed some light on some aspects of Kubernetes that go past the 'Kubernetes 101' stage. Before I forget, here's a good overview from the official documentation on using Kubernetes in production.

I have a lot more Kubernetes things on my plate, and I hope to write blog posts on all of them. Some of these:

  • ingress controllers based on traefik
  • creation and renewal of Let's Encrypt certificates
  • monitoring
  • logging
  • using the Helm package manager
  • ...and more


Modifying EC2 security groups via AWS Lambda functions

One task that comes up again and again is adding, removing or updating source CIDR blocks in various security groups in an EC2 infrastructur...